KVM 虚拟化以及基于 KVM 的技术例如 OpenStack 和 OpenShift 云平台上的虚拟机网卡使用的是 virtio 类型
virtio 类型是一种半虚拟化 (Para-virtualization) 技术。其没有速度限制,会随着宿主机的网络、处理器、内存的实际情况实时发生变化,能多快就跑多快
使用类似 ethtool 的命令查看 virtio 类型的网卡时不会显示网卡速度
[步骤] KVM 虚拟机模板的创建 (CentOS Linux 9 版)
注意:
在创建 KVM 虚拟机之前要先安装 KVM 并创建 KVM 虚拟网络
镜像准备:
在 Rocky Linux 官网上下载安装系统所需要的镜像:
https://rockylinux.org/download
正文:
步骤一:理解创建 KVM 虚拟机模板的目的
主要用于批量克隆出新的 KVM 机器,节约创建新虚拟机的时间
步骤二:为这个虚拟机创建硬盘文件
2.1 创建硬盘文件
(只在真机上执行以下步骤)
# qemu-img create -f qcow2 /var/lib/libvirt/images/rockylinux9.qcow2 10G(补充:这里以创建 10G 大小的 rockylinux9.qcow2 硬盘文件为例)
2.2 确认硬盘文件已创建
(只在真机上执行以下步骤)
# ls /var/lib/libvirt/images/ | grep rockylinux9.qcow2(补充:这里以显示 rockylinux9.qcow2 硬盘文件为例)
步骤三:使用 KVM 和刚刚创建的硬盘文件新安装一台虚拟机
3.1 启动 KVM 的 virt-manager
(只在真机上执行以下步骤)
# virt-manager3.2 在 virt-manager 上的左上角点击文件之后点击 “新建虚拟机”
(只在真机上执行以下步骤)
(步骤略)
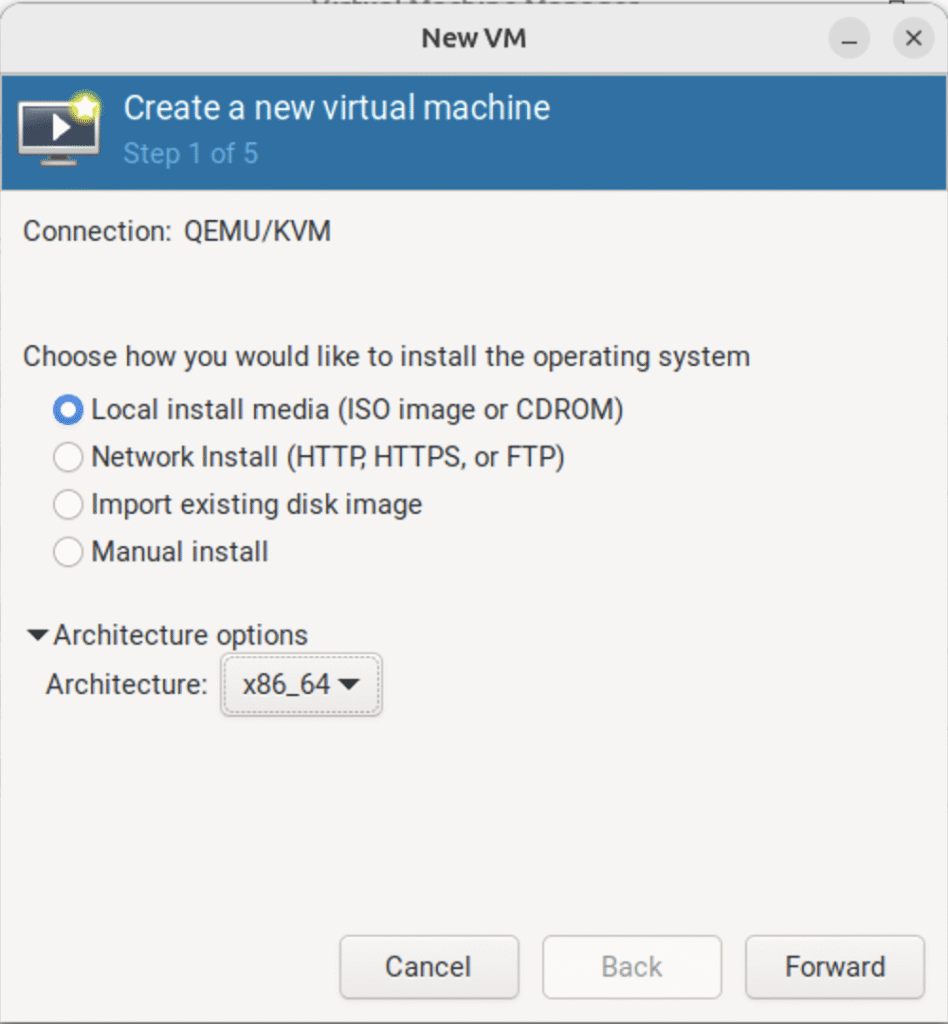
3.2.1 选择以本地安装介质的方式安装系统
(只在真机上执行以下步骤)
(图:1)
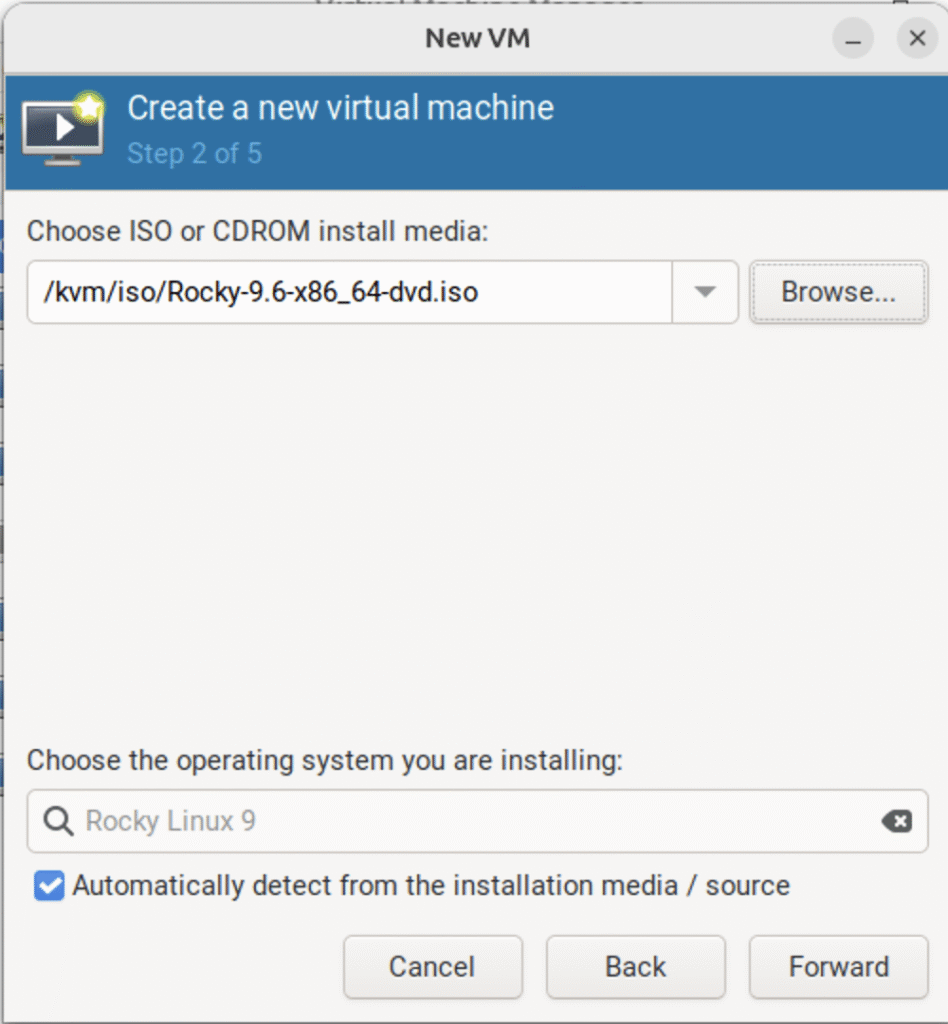
3.2.2 选择安装系统的系统镜像
(只在真机上执行以下步骤)
(图:2)
(补充:这里以使用 Rocky-9.6-x86_6-dvd1.iso 系统镜像为例)
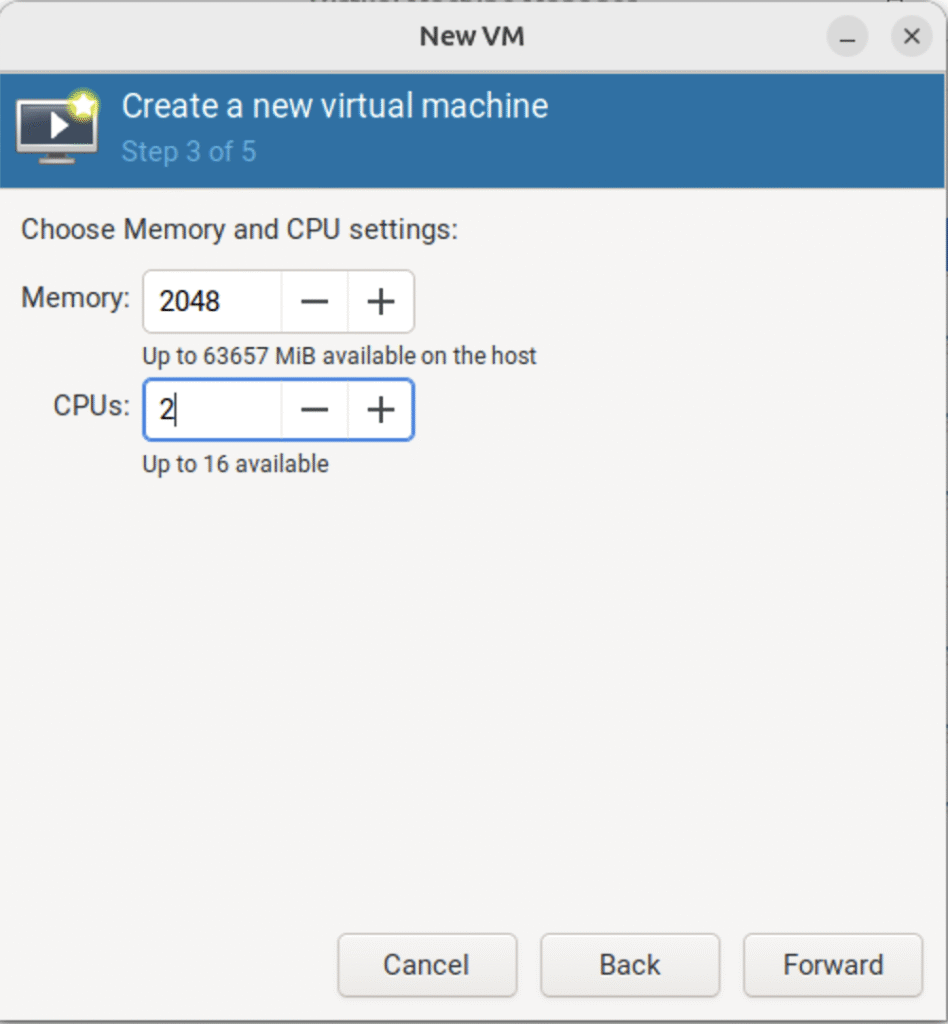
3.2.3 设置内存大小和 CPU 核心数
(只在真机上执行以下步骤)
(图:3)
(补充:这里以设置 2048 MiB 内容和 2 核 CPU 为例)
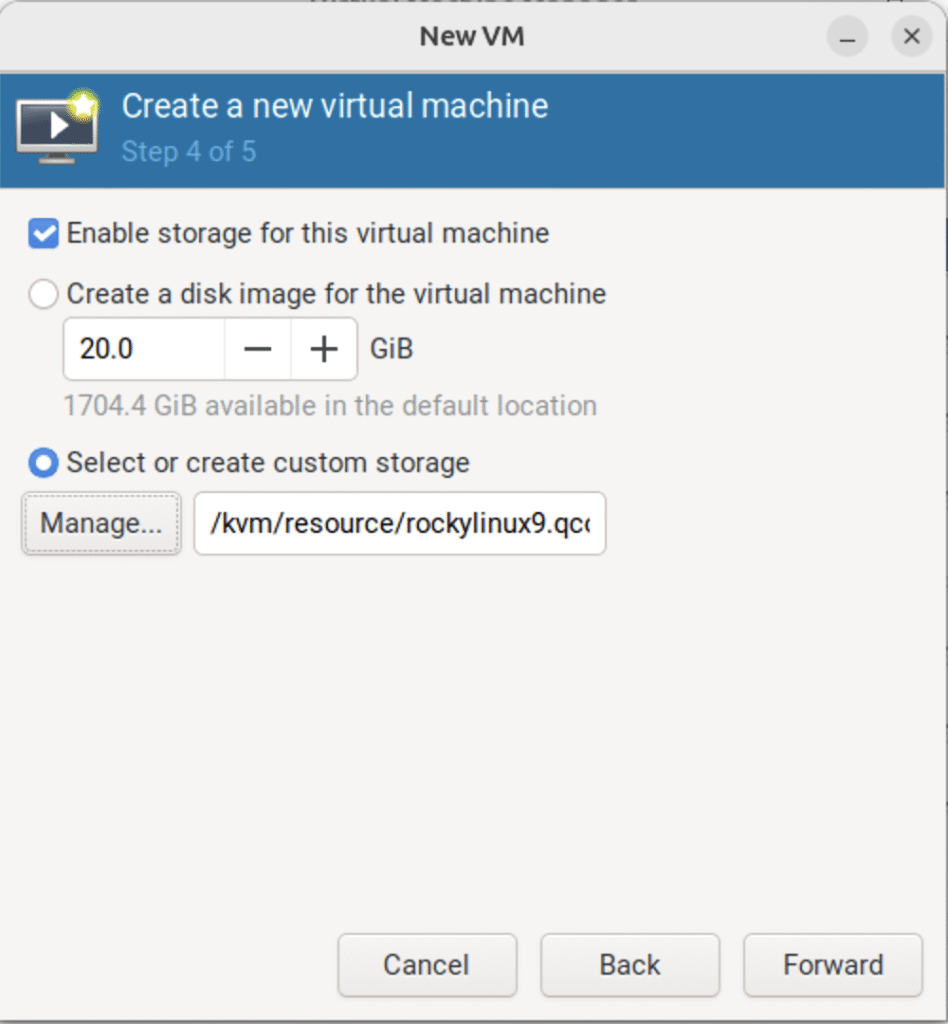
3.2.4 选择用刚刚创建的硬盘文件来安装系统
(只在真机上执行以下步骤)
(图:4)
(补充:这里以使用 rockylinux9.qcow2 硬盘文件为例)
3.2.5 给虚拟机命名并选择虚拟网络
(只在真机上执行以下步骤)
(注意:虚拟网络必须提前创建好)
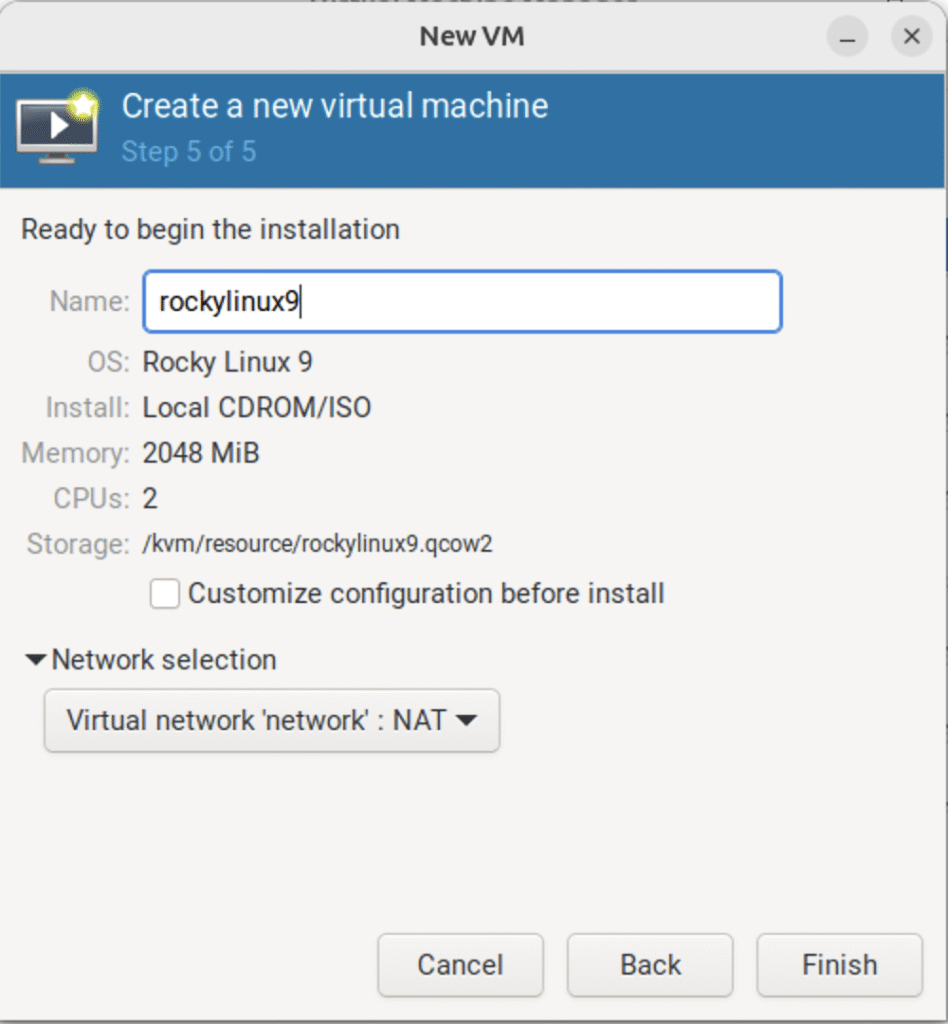
(图:5)
(补充:这里以将虚拟机命名为 rockylinux9 并使用 network 网络为例)
3.2.6 开始安装系统
(只在真机上执行以下步骤)
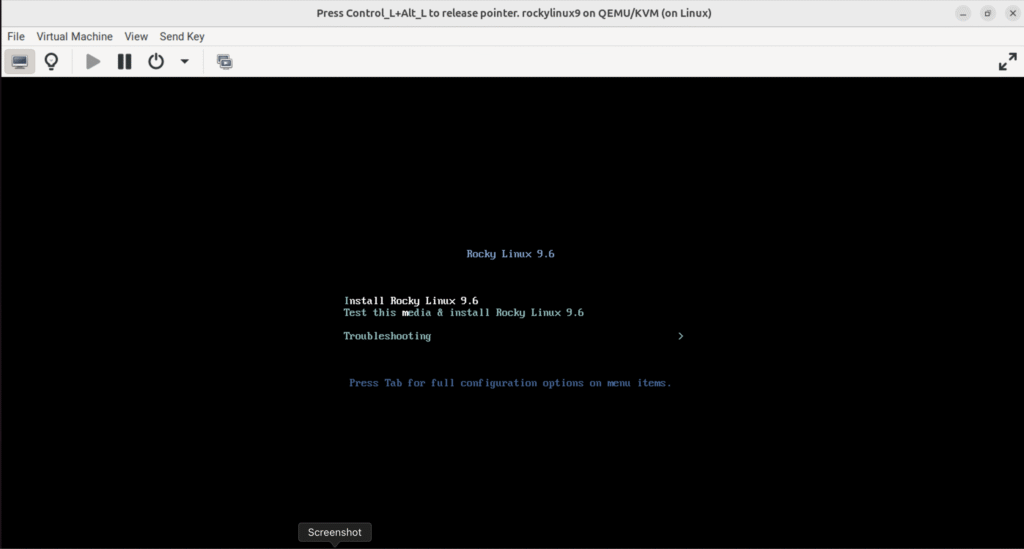
(图:6)
3.2.7 选择系统语言
(只在真机上执行以下步骤)
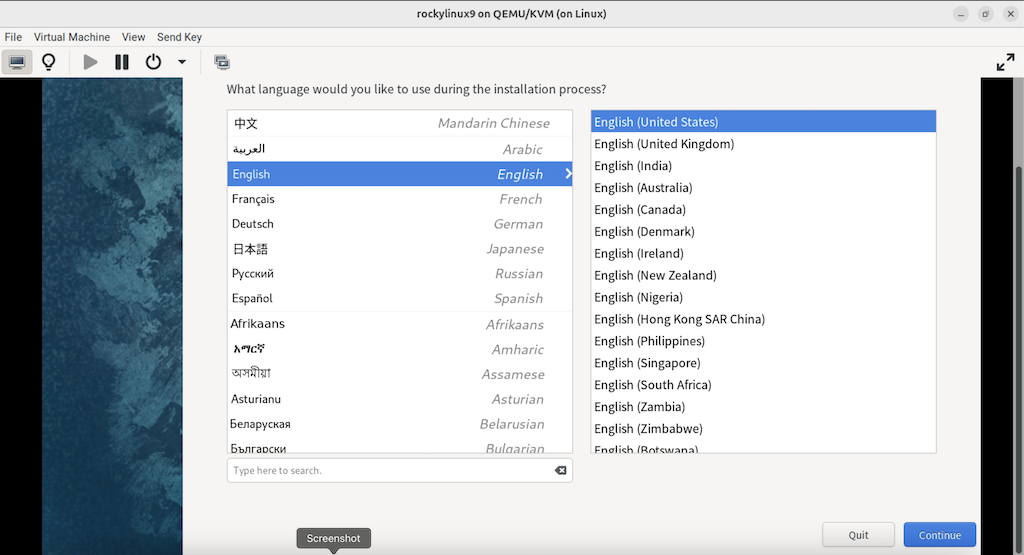
(图:7)
3.2.8 之后进行系统配置界面
(只在真机上执行以下步骤)
需要手动配置的地方有四个:
1) “INSTALLATION DESTINATION”
2) “KDUMP”
3) “SOFTWARE SELECTION”
4) “Root Password”
分别点击以后就可以配置了
3.2.8.1 通过 “INSTALLATION DESTINATION” 对硬盘进行分区
(只在真机上执行以下步骤)
(补充:完成后点击左上角的 “DONE”)
(注意:只分一个分区,只设置一个挂载点挂载到根 “/”,使用标准硬盘类型,硬盘格式设置为 XFS)
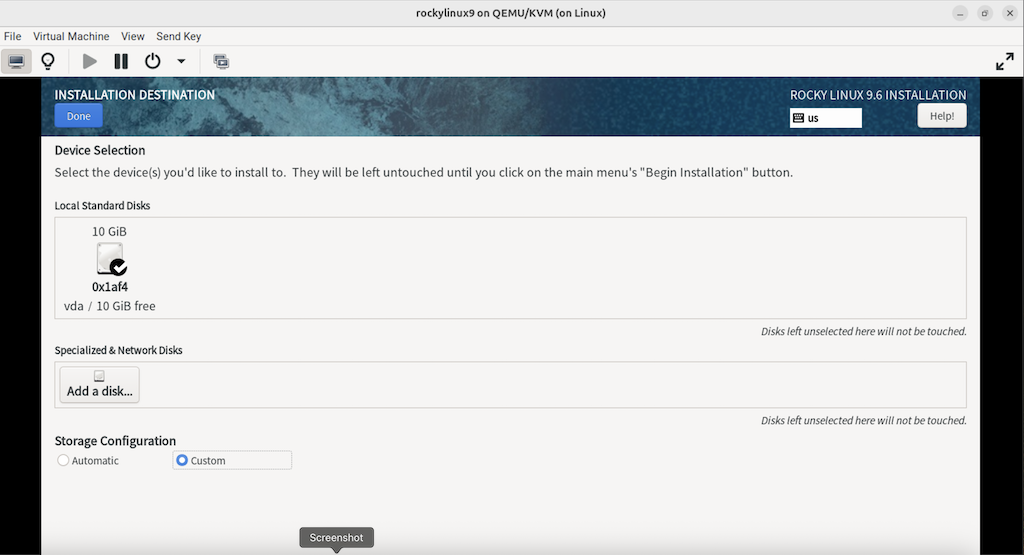
(图:8)
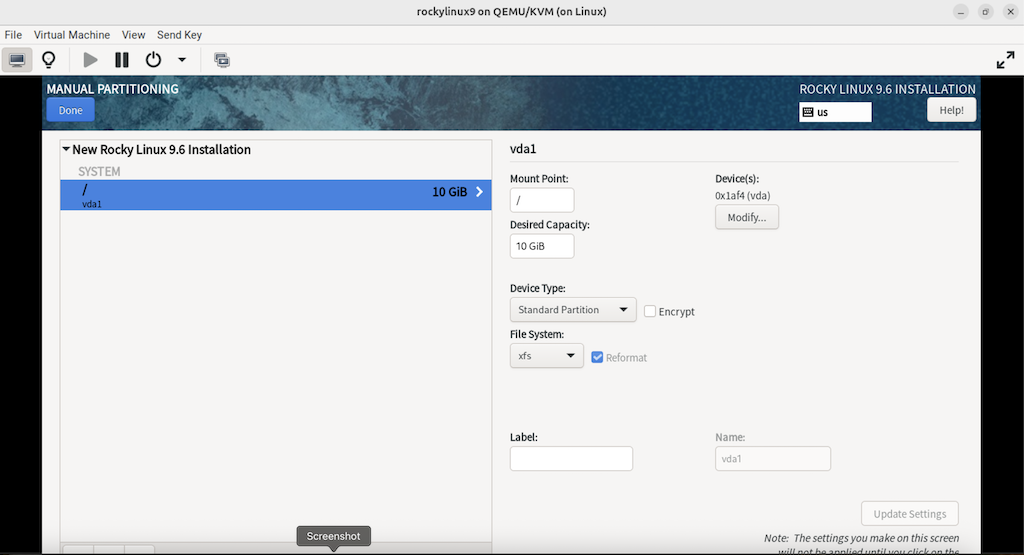
(图:9)
3.2.8.2 取消 “KDUMP”
(只在真机上执行以下步骤)
(补充:完成后点击左上角的 “DONE”)
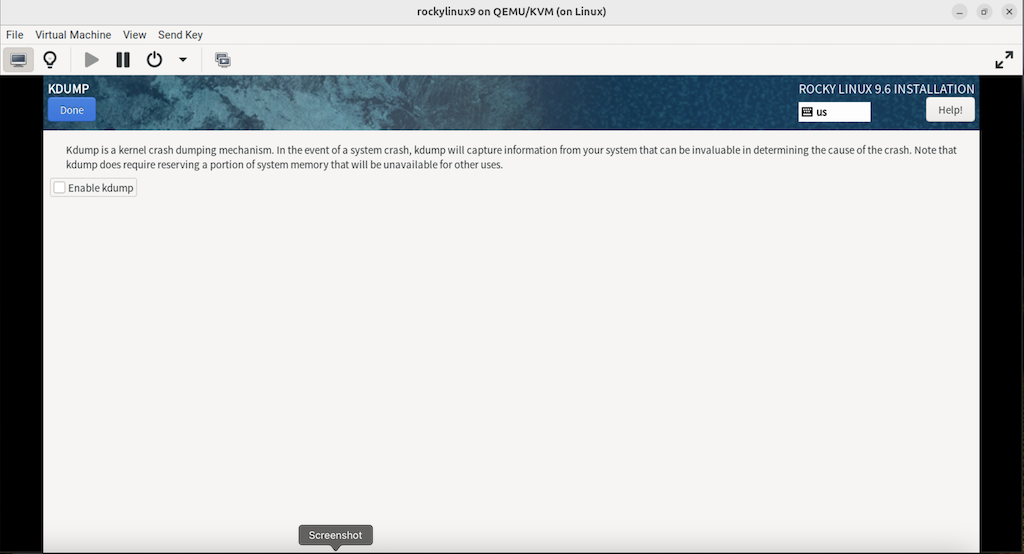
(图:10)
3.2.8.3 选择最小化安装系统
(只在真机上执行以下步骤)
(补充:完成后点击左上角的 “DONE”)
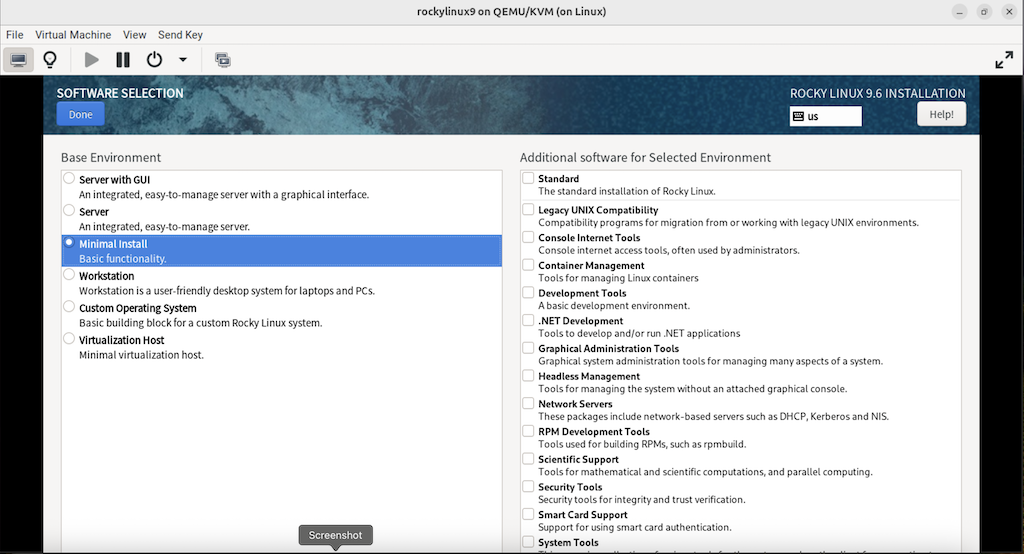
(图:11)
3.2.8.4 设置 ROOT 密码
(只在真机上执行以下步骤)
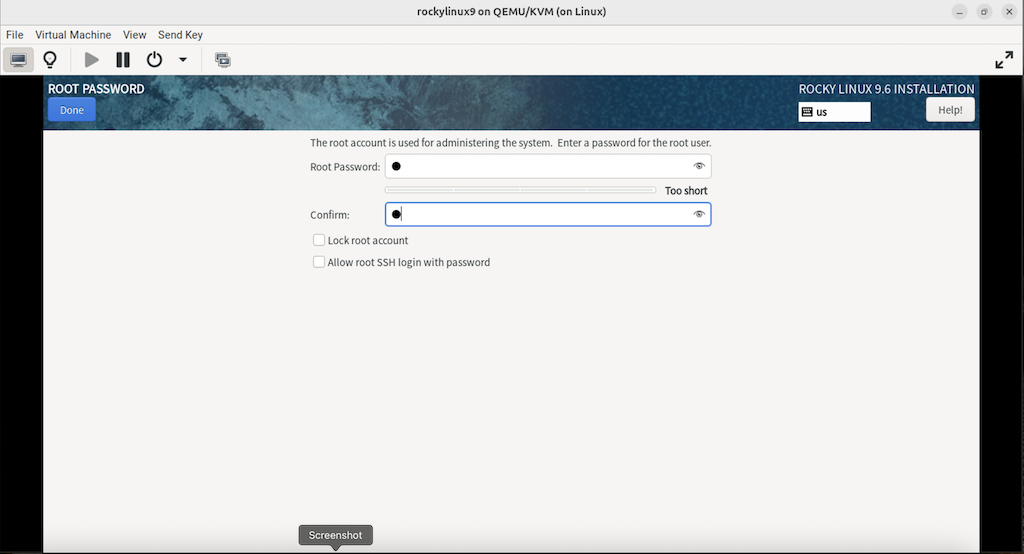
(图:12)
3.2.9 之后点击右下角的 “BEGIN INSTALLATION”
(只在真机上执行以下步骤)
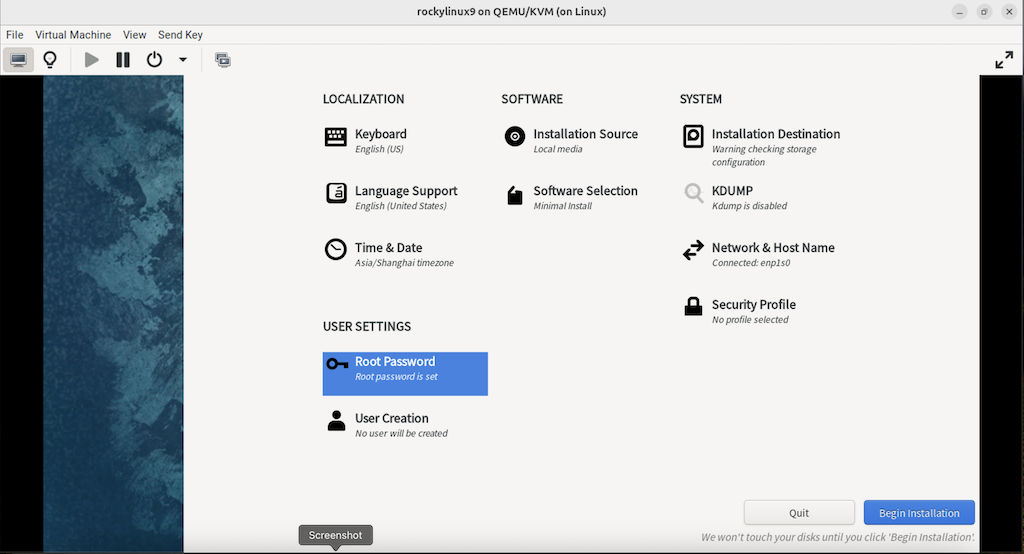
(图:13)
3.2.10 安装完成后重启
(只在真机上执行以下步骤)
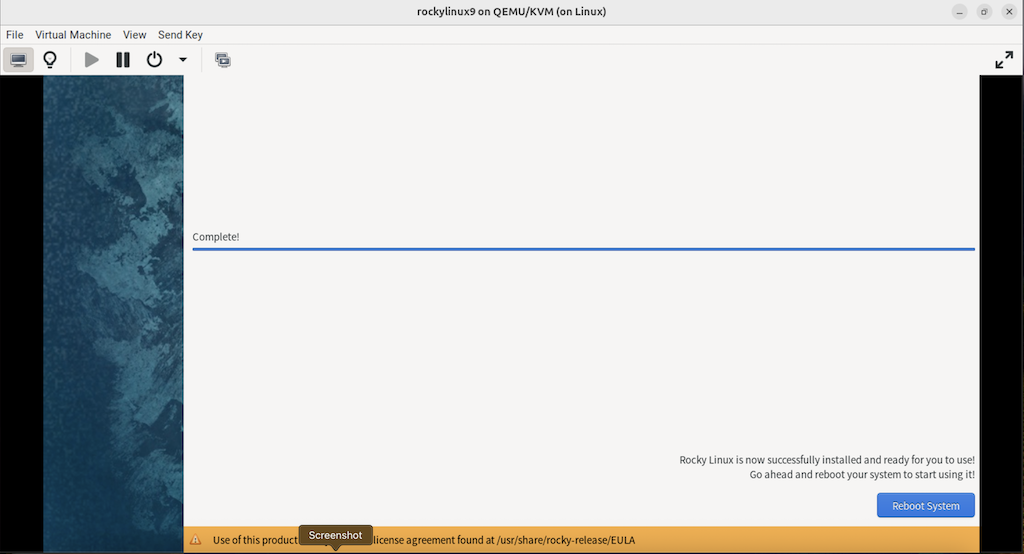
3.2.11 在安装系统的过程中需要注意的内容总结
(只在真机上执行以下步骤)
1) 一定要使用刚刚创建的 /var/lib/libvirt/images/rockylinux8.qcow2 作为安装虚拟机的硬件文件
2) 虚拟机网络 “0” 要提前创建好
3) 只分一个分区,只设置一个挂载点挂载到根 “/”,使用标准硬盘,硬盘格式是 XFS
4) 取消 “KDUMP”
5) 选择最小化安装系统
6) 设置 root 密码
步骤四:进入新创建虚拟机修改配置
4.1 允许 root 用户远程登陆
4.1.1 修改 SSH 配置文件
# vi /etc/ssh/sshd_config在此行下面:
......
#PermitRootLogin prohibit-password
......
添加:
......
PermitRootLogin yes
......
4.1.2 让刚刚修改的配置文件生效
# systemctl restart ssd4.2 修改网卡个性化设置
4.2.1 修改网卡配置文件
(只在虚拟机上执行以下步骤)
# vi /etc/NetworkManager/system-connections/enp1s0.nmconnection将全部内容修改如下:
[connection]
id=enp1s0
type=ethernet
autoconnect-priority=-999
interface-name=enp1s0
timestamp=1755516857

[ethernet]

[ipv4]
method=auto
4.2.2 使修改的网卡配置生效
(只在虚拟机上执行以下步骤)
# reboot4.3 禁用 SELinux
(只在虚拟机上执行以下步骤)
# vi /etc/selinux/config将全部内容修改如下:
# This file controls the state of SELinux on the system.
# SELINUX= can take one of these three values:
#     enforcing - SELinux security policy is enforced.
#     permissive - SELinux prints warnings instead of enforcing.
#     disabled - No SELinux policy is loaded.
# See also:
# https://access.redhat.com/documentation/en-us/red_hat_enterprise_linux/9/html/using_selinux/changing-selinux-states-and-modes_using-selinux#changing-selinux-modes-at-boot-time_changing-selinux-states-and-modes
#
# NOTE: Up to RHEL 8 release included, SELINUX=disabled would also
# fully disable SELinux during boot. If you need a system with SELinux
# fully disabled instead of SELinux running with no policy loaded, you
# need to pass selinux=0 to the kernel command line. You can use grubby
# to persistently set the bootloader to boot with selinux=0:
#
#    grubby --update-kernel ALL --args selinux=0
#
# To revert back to SELinux enabled:
#
#    grubby --update-kernel ALL --remove-args selinux
#
SELINUX=disabled
# SELINUXTYPE= can take one of these three values:
#     targeted - Targeted processes are protected,
#     minimum - Modification of targeted policy. Only selected processes are protected.
#     mls - Multi Level Security protection.
SELINUXTYPE=targeted
4.4 禁用空路由
(只在虚拟机上执行以下步骤)
# vi /etc/sysconfig/network将全部内容修改如下:
# Created by anaconda
NOZEROCONF="yes"
4.5 添加 Console 配置
4.5.1 修改 GRUB 内核配置文件
(只在虚拟机上执行以下步骤)
# vi /etc/default/grub将全部内容修改如下:
GRUB_TIMEOUT=5
GRUB_DISTRIBUTOR="$(sed 's, release .*$,,g' /etc/system-release)"
GRUB_DEFAULT=saved
GRUB_DISABLE_SUBMENU=true
GRUB_TERMINAL_OUTPUT="console"
GRUB_SERIAL_COMMAND="serial --unit=1 --speed=115200"
GRUB_CMDLINE_LINUX="biosdevname=0 net.ifnames=0 console=tty0 console=ttyS0,115200n8"
GRUB_DISABLE_RECOVERY="true"
GRUB_ENABLE_BLSCFG=true
4.5.2 使修改的 GRUB 内核配置生效
(只在虚拟机上执行以下步骤)
# grub2-mkconfig -o grub4.6 将系统自动挂载的硬盘从使用 UUID 换成硬件路径
4.6.1 显示根 “/” 分区的 UUID
(只在虚拟机上执行以下步骤)
# blkid
/dev/vda1: UUID="682d9854-9ca6-4272-9adb-dc9bee3098f6" TYPE="xfs" PARTUUID="bf6af362-01"
(补充:这里的 UUID 是: 682d9854-9ca6-4272-9adb-dc9bee3098f6)
4.6.2 在自动挂载文件里将根 “/” 分区的 UUID 换成硬件路径
(只在虚拟机上执行以下步骤)
# vi /etc/fstab将以下内容:
......
UUID=682d9854-9ca6-4272-9adb-dc9bee3098f6 /                   xfs     defaults        0 0
(补充:这里的 UUID 是: 682d9854-9ca6-4272-9adb-dc9bee3098f6)
修改为:
/dev/sda1 / xfs defaults 0 04.7 删除不用的程序
(只在虚拟机上执行以下步骤)
# yum -y remove firewalld-* python-firewall4.8 对虚拟系统进行升级
(只在虚拟机上执行以下步骤)
# yum -y update4.9 进行分区扩展
4.9.1 安装分区扩展软件
(只在虚拟机上执行以下步骤)
# yum install -y cloud-utils-growpart4.9.2 给开机自启配置文件相应的权限
# chmod 755 /etc/rc.local4.9.3 设置开机自动扩容根 “/” 目录
(只在虚拟机上执行以下步骤)
# vi /etc/rc.local添加以下内容:
......
/usr/bin/growpart /dev/sda1
/usr/sbin/xfs_growfs /
4.10 修改虚拟机系统的名称
(只在虚拟机上执行以下步骤)
# vi /etc/hostname将全部内容修改如下:
rockylinux94.11 启用 serial 服务实现通过 virsh console 命令控制虚拟机
(只在虚拟机上执行以下步骤)
# systemctl start serial-getty@ttyS0
# systemctl enable serial-getty@ttyS0
4.12 清除虚拟系统的历史命令
(只在虚拟机上执行以下步骤)
# history -c4.13 关闭虚拟机
(只在虚拟机上执行以下步骤)
# poweroff步骤五:在真机上对虚拟机进行清理优化
(只在真机上执行以下步骤)
# sudo virt-sysprep -d rockylinux9(补充:这里以清理 rockylinux9 虚拟机为例)
(
注意:如果此命令不存在
1) Rocky Linux 系统的话需要安装 libguestfs-tools
2) openSUSE 系统的话需要安装 guestfs-tools
)
步骤六:此时就可以将此虚拟机的硬件文件作为模板进行批量克隆虚拟机了
(只在真机上执行以下步骤)
(步骤略)
[排错] 解决虚拟机使用命令 nmcli connection up enp1s0 时报错 “Error: Connection activation failed: No suitable device found for this connection (device eth0 not available because profile is not compatible with device (mismatching interface name)). ” (给网卡配置的静态 IP 地址无法生效)
报错代码
# nmcli connection up enp1s0
Error: Connection activation failed: No suitable device found for this connection (device eth0 not available because profile is not compatible with device (mismatching interface name)).
解决方法
步骤一:在虚拟机管理器上刷新虚拟机网卡的 MAC 地址或者删除原网卡添加一个新网卡
(步骤略)
步骤二:删除 NetworkManager 上所有的网卡配置
2.1 显示目前 NetworkManager 所有的网卡配置
# nmcli connection show2.2 删除 NetworkManager 上所有的网卡配置
# nmcli connection delete enp1s0
# nmcli connection delete Wired\ connection\ 1
(补充:这里以删除网卡配置 enp1s0 和 Wired\ connection\ 1 为例)
2.3 确保目前 NetworkManager 没有网卡配置
# nmcli connection show(注意:确保这条命令输入后没有输出结果)
步骤三:添加新的 NetworkManager 网卡配置
3.1 显示目前的网卡硬件
# nmcli device show(注意:这里需要记住网卡硬件的名称,因为下个步骤需要使用)
3.2 添加新的 NetworkManager 网卡配置
# nmcli connection add con-name eth0 ifname eth0 type ethernet(补充:这里以给 eth0 网卡添加个名为 eth0 的 NetworkManager 网卡配置为例)
(注意:这里的 ifname 后面的名称,必须和上个步骤输出命令后显示的网卡硬件名称一致)
3.3 让刚刚添加的 NetworkManager 网卡配置生效
# nmcli device connect eth0(补充:这里以启动 eth0 网卡为例)
(注意:这里的 eth0 是在上个步骤中使用 con-name 参数配置的网卡配置名)
步骤四:给 NetworkManager 网卡配置设置 IP 地址
4.1 给 NetworkManager 网卡配置设置 IP 地址
# nmcli connection modify eth0 ipv4.method manual ipv4.addresses 192.168.100.8/24 ipv4.gateway 192.168.100.1 autoconnect yes ipv4.dns 1.1.1.1(补充:这里以给 eth0 网卡添加静态 IP 地址 192.168.100.8/24,网关 IP 地址 192.168.100.1,DNS 1.1.1.1 并开机自启为例)
(注意:这里的 eth0 是在前面的步骤中使用 con-name 参数配置的网卡配置名)
4.2 让刚刚配置的 IP 地址生效
# nmcli connection up eth0 (补充:这里以让 eth0 网卡上配置的 IP 地址生效为例)
(注意:这里的 eth0 是在前面的步骤中使用 con-name 参数配置的网卡配置名)
[步骤] KVM 环境变化后模板虚拟机 XML 文件的修改 (从 Rocky Linux 8 的 KVM 更换到 openSUSE 15.6 的 KVM 版)
步骤一:使用新的 KVM 创建 1 台虚拟机
(步骤略)
步骤二:拷贝新创建虚拟的 XML 文件并和模板虚拟机的 XML 文件进行比较
(步骤略)
(补充:KVM 新创建的虚拟机 XML 文件默认放在 /etc/libvirt/qemu/ 目录里)
步骤三:修改模板虚拟机的 XML 文件
3.1 修改 os 参数
将以下内容:
  <os>
    <type arch='x86_64' machine='pc-q35-rhel8.6.0'>hvm</type>
    <boot dev='hd'/>
  </os>
修改为:
  <os>
    <type arch='x86_64' machine='pc-q35-8.2'>hvm</type>
    <boot dev='hd'/>
  </os>
(补充:这里是以将模板虚拟机的运行环境从 Rocky Linux 8 的 KVM 更换到 openSUSE 15.6 的 KVM 为例)
3.2 修改 emulator 参数
将以下内容:
<emulator>/usr/libexec/qemu-kvm</emulator>修改为:
<emulator>/usr/bin/qemu-system-x86_64</emulator>(补充:这里是以将模板虚拟机的运行环境从 Rocky Linux 8 的 KVM 更换到 openSUSE 15.6 的 KVM 为例)
3.3 修改 graphics 参数
将以下内容:
    <graphics type='vnc' autoport='yes'>
      <listen type='address'/>
      <image compression='off'/>
    </graphics>
修改为:
    <graphics type='spice' autoport='yes'>
      <listen type='address'/>
      <image compression='off'/>
    </graphics>
(补充:这里是以将模板虚拟机的运行环境从 Rocky Linux 8 的 KVM 更换到 openSUSE 15.6 的 KVM 为例)
[排错] 解决 Linux 创建 VM 时报错 “blk_cloned_rq_check_limits”
报错代码
kernel: blk_cloned_rq_check_limits: over max size limit. (65535 > 0)分析
SAN 存储设备需要 ’68 Support Page Reclamation for Linux bit’ 功能开启后才能实现精简配置
解决方法
在 SAN 存储设备上开启 ’68 Support Page Reclamation for Linux bit’ 功能后执行以下命令:
$ for i in /sys/block/sd*; do echo 1 > $i/device/rescan; done
$ multipath -r
$ multipath -ll
参考文献
https://access.redhat.com/solutions/5619941
