
内容一:判断 Linux 是 BIOS 还是 EFI 的方法
# ls -ld /sys/firmware/efi(补充:如果 /sys/firmware/efi 目录存在,则代表系统是 EFI,否则系统是 BIOS)
内容二:判断 Linux 是 BIOS 还是 EFI 的脚本
# [ -d /sys/firmware/efi ] && echo UEFI || echo BIOS# ls -ld /sys/firmware/efi(补充:如果 /sys/firmware/efi 目录存在,则代表系统是 EFI,否则系统是 BIOS)
# [ -d /sys/firmware/efi ] && echo UEFI || echo BIOS在创建 KVM 虚拟机之前要先安装 KVM 并创建 KVM 虚拟网络
在 openSUSE 官网上下载安装系统所需要的镜像:
https://software.opensuse.org/distributions/leap
主要用于批量克隆出新的 KVM 机器,节约创建新虚拟机的时间
(只在真机上执行以下步骤)
# qemu-img create -f qcow2 /var/lib/libvirt/images/template_opensuse_leap_15_10g.qcow2 10G(补充:这里以创建 10G 大小的 template_opensuse_leap_15_10g.qcow2 硬盘文件为例)
(只在真机上执行以下步骤)
# ls /var/lib/libvirt/images/ | grep template_opensuse_leap_15_10g.qcow2(补充:这里以确认 template_opensuse_leap_15_10g.qcow2 硬盘文件为例)
(只在真机上执行以下步骤)
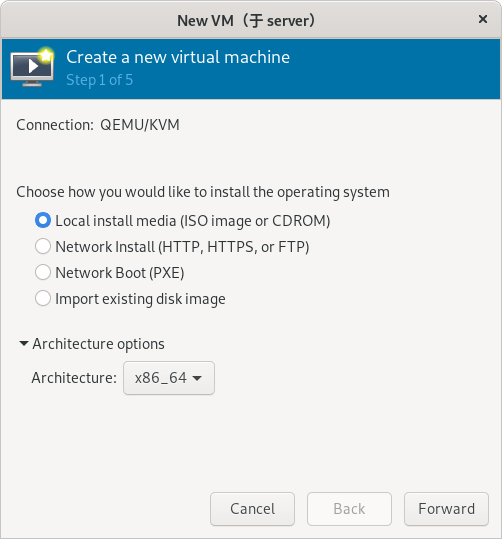
# virt-manager(只在真机上执行以下步骤)
(步骤略)
(只在真机上执行以下步骤)
(只在真机上执行以下步骤)
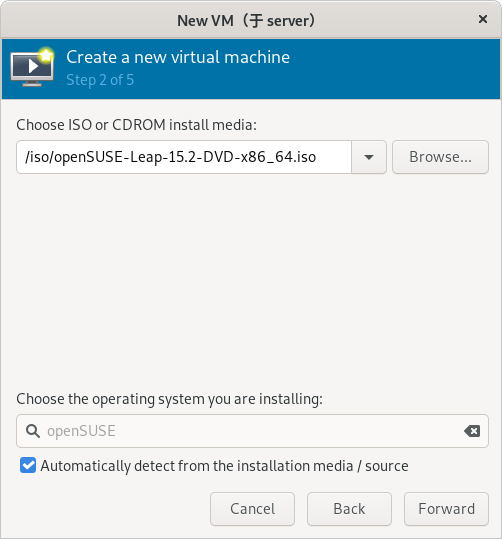
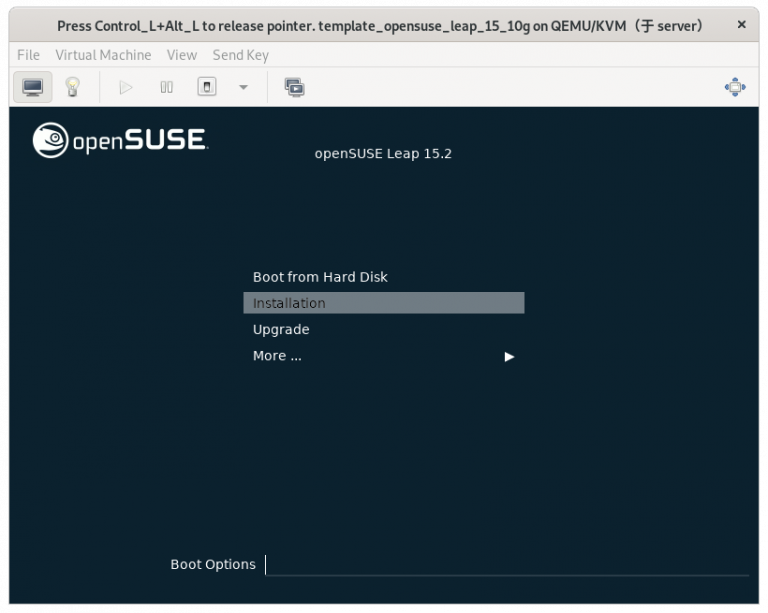
(补充:这里以使用 openSUSE-Leap-15.2-DVD-x86_64.iso 系统镜像为例)
(只在真机上执行以下步骤)
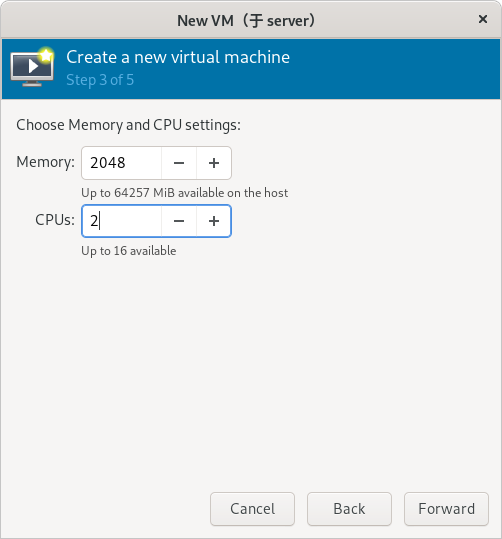
(补充:这里以设置 2048 MiB 内容和 2 核 CPU 为例)
(只在真机上执行以下步骤)
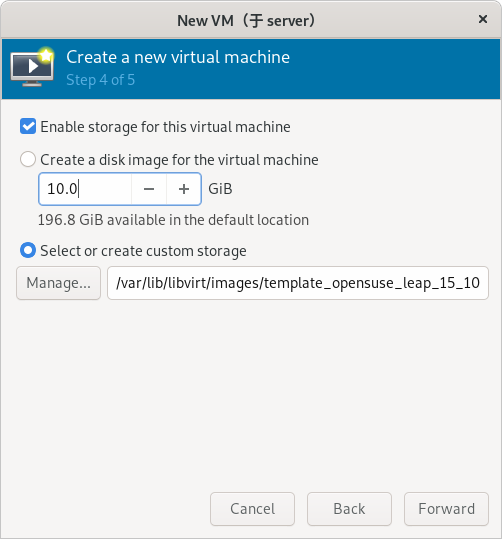
(补充:这里以使用 template_opensuse_leap_15_10g.qcow2 硬盘文件为例)
(只在真机上执行以下步骤)
(注意:虚拟网络必须提前创建好)
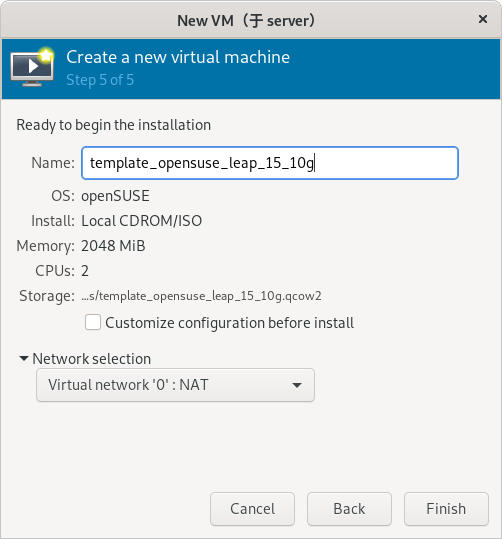
(补充:这里以将虚拟机命名为 template_opensuse_leap_15_10g 并使用 0 网络为例)
(只在真机上执行以下步骤)
(只在真机上执行以下步骤)
(只在真机上执行以下步骤)
(只在真机上执行以下步骤)
(只在真机上执行以下步骤)

(只在真机上执行以下步骤)
(只在真机上执行以下步骤)
(只在真机上执行以下步骤)

(只在真机上执行以下步骤)

(只在真机上执行以下步骤)
(只在真机上执行以下步骤)
(只在真机上执行以下步骤)
(只在真机上执行以下步骤)

(只在真机上执行以下步骤)
(只在真机上执行以下步骤)
(只在真机上执行以下步骤)
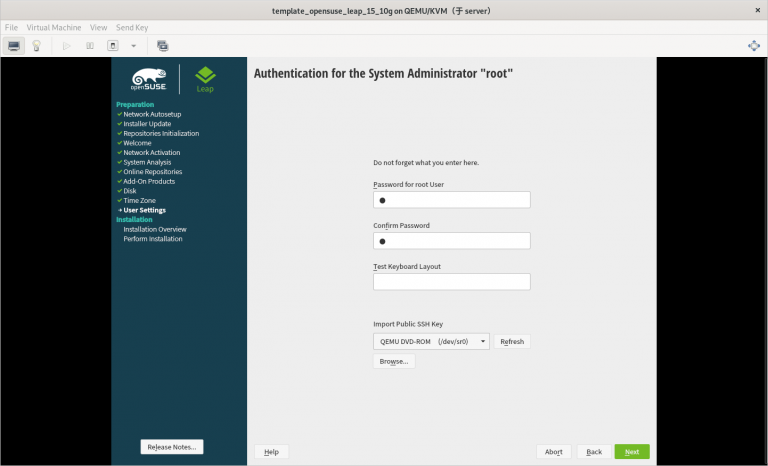
1) 一定要使用刚刚创建的 template_opensuse_leap_15_10g.qcow2 作为安装虚拟机的硬件文件
2) 虚拟机网络 “0” 要提前创建好
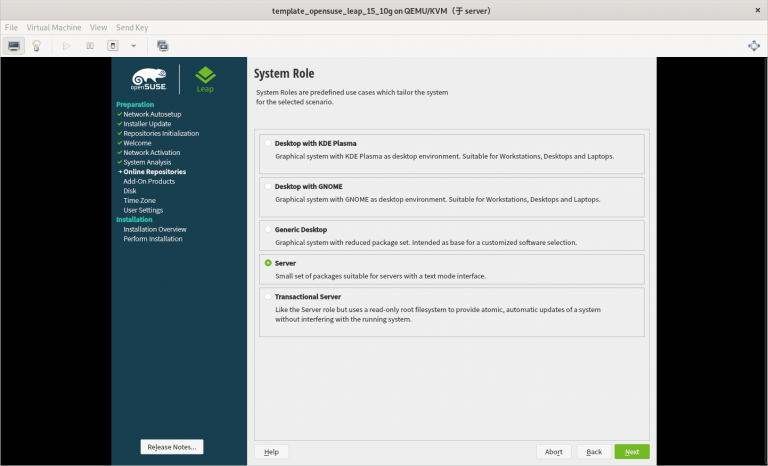
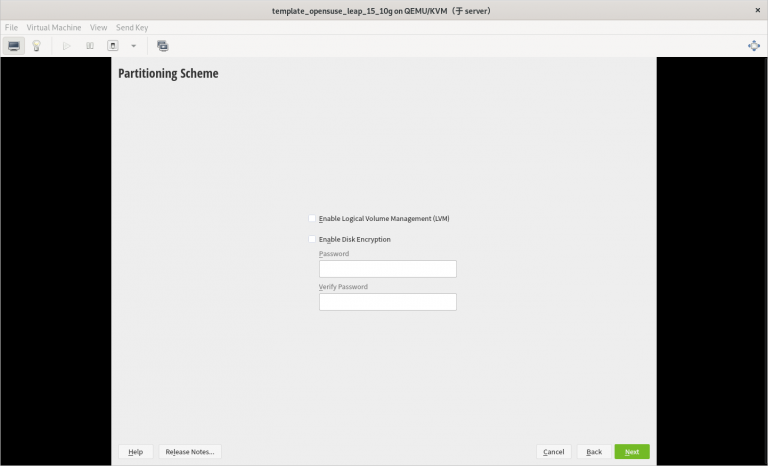
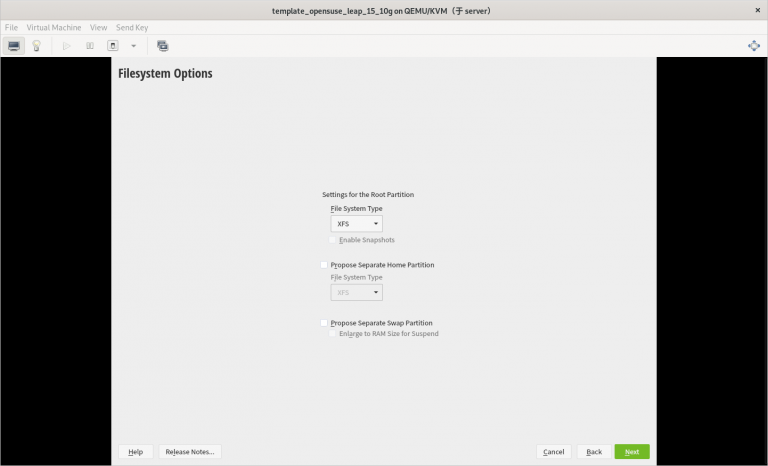
3) 只分一个分区,只设置一个挂载点挂载到根 “/”,使用标准硬盘,硬盘格式是 XFS
4) 选择最小化安装系统
(只在虚拟机上执行以下步骤)
# vi /etc/default/grub将全部内容修改如下:
# If you change this file, run 'grub2-mkconfig -o /boot/grub2/grub.cfg' afterwards to update
# /boot/grub2/grub.cfg.

# Uncomment to set your own custom distributor. If you leave it unset or empty, the default
# policy is to determine the value from /etc/os-release
GRUB_DISTRIBUTOR=
GRUB_DEFAULT=saved
GRUB_HIDDEN_TIMEOUT=0
GRUB_HIDDEN_TIMEOUT_QUIET=true
GRUB_TIMEOUT=8
GRUB_CMDLINE_LINUX_DEFAULT="splash=silent mitigations=auto quiet"
GRUB_SERIAL_COMMAND="serial --unit=1 --speed=115200"
GRUB_CMDLINE_LINUX="biosdevname=0 net.ifnames=0 console=tty0 console=ttyS0,115200n8"
GRUB_DISABLE_LINUX_UUID="true"
GRUB_ENABLE_LINUX_LABEL="true"
GRUB_DISABLE_RECOVERY="true"

# Uncomment to automatically save last booted menu entry in GRUB2 environment

# variable `saved_entry'
# GRUB_SAVEDEFAULT="true"
#Uncomment to enable BadRAM filtering, modify to suit your needs

# This works with Linux (no patch required) and with any kernel that obtains
# the memory map information from GRUB (GNU Mach, kernel of FreeBSD ...)
# GRUB_BADRAM="0x01234567,0xfefefefe,0x89abcdef,0xefefefef"
#Uncomment to disable graphical terminal (grub-pc only)

GRUB_TERMINAL="gfxterm"
# The resolution used on graphical terminal
#note that you can use only modes which your graphic card supports via VBE

# you can see them in real GRUB with the command `vbeinfo'
GRUB_GFXMODE="auto"
# Uncomment if you don't want GRUB to pass "root=UUID=xxx" parameter to Linux
# GRUB_DISABLE_LINUX_UUID=true
#Uncomment to disable generation of recovery mode menu entries

# GRUB_DISABLE_RECOVERY="true"
#Uncomment to get a beep at grub start

# GRUB_INIT_TUNE="480 440 1"
GRUB_BACKGROUND=
GRUB_THEME=/boot/grub2/themes/openSUSE/theme.txt
SUSE_BTRFS_SNAPSHOT_BOOTING="true"
GRUB_DISABLE_OS_PROBER="false"
GRUB_ENABLE_CRYPTODISK="n"
GRUB_CMDLINE_XEN_DEFAULT="vga=gfx-1024x768x16"(只在虚拟机上执行以下步骤)
# grub2-mkconfig -o grub(只在虚拟机上执行以下步骤)
# blkid
/dev/vda1: UUID="53ee2f87-89b8-4cd7-a4dc-0957d28f4831" TYPE="xfs" PARTUUID="3d8377ef-01"
(补充:这里的 UUID 是: 53ee2f87-89b8-4cd7-a4dc-0957d28f4831)
(只在虚拟机上执行以下步骤)
# vi /etc/fstab将以下内容:
......
UUID=53ee2f87-89b8-4cd7-a4dc-0957d28f4831 /                   xfs     defaults        0 0
(补充:这里的 UUID 是: 53ee2f87-89b8-4cd7-a4dc-0957d28f4831)
修改为:
......
/dev/vda1 / xfs defaults 0 0(只在虚拟机上执行以下步骤)
# zypper -n rm firewalld-*(只在虚拟机上执行以下步骤)
# zypper -n in growpart# vim /etc/init.d/after.local创建以下内容:
/usr/bin/growpart /dev/sda1
/usr/sbin/xfs_growfs /# chmod 755 /etc/init.d/after.local(只在虚拟机上执行以下步骤)
# zypper mr -da(只在虚拟机上执行以下步骤)
# zypper ar -fcg http://10.0.0.254/openSUSE-Leap-15/ lan(注意: http://10.0.0.254/openSUSE-Leap-15/ 需要根据真实环境的情况进行更改)
(只在虚拟机上执行以下步骤)
# zypper ref(只在虚拟机上执行以下步骤)
# hostnamectl set-hostname template_opensuse_leap_15_10g(只在虚拟机上执行以下步骤)
# systemctl start serial-getty@ttyS0
# systemctl enable serial-getty@ttyS0(只在虚拟机上执行以下步骤)
# history -c(只在虚拟机上执行以下步骤)
# poweroff删除配置文件里 cdrom 相关的部分
# vim /etc/libvirt/qemu/template_opensuse_leap_15_10g.xml删除以下内容:
......
    <disk type='file' device='cdrom'>
      <driver name='qemu' type='raw'/>
      <source file='/test/iso/openSUSE-Leap-15.2-DVD-x86_64.iso'/>
      <target dev='sda' bus='sata'/>
      <readonly/>
      <address type='drive' controller='0' bus='0' target='0' unit='0'/>
    </disk>
......(只在真机上执行以下步骤)
(步骤略)
作者:朱明宇
名称:批量设置官方软件源(openSUSE 版)
作用:批量设置官方软件源(openSUSE 版)
1. 服务器清单 $add_repo_servers_list.txt 每个服务器名占用 1 行,并和此脚本放在同一目录下
2. 在此脚本的分割线内写入相应的内容
3. 给此脚本添加执行权限
4. 执行此脚本
add_repo_servers_list.txt #指定存放要设置官方软件源的文件
1. 此脚本执行前必须要先保证执行此脚本的用户能无密码 ssh 远程这些远程服务器
2. 服务器的系统需要是 openSUSE 15.2 版本
3. 服务器系统要配置好可用的软件源(最好是软件数量最多的官方版本)
4. 这些远程服务器要能够连接外网
#!/bin/bash

####################### Separator ########################

add_repo_servers_list.txt

####################### Separator ########################

cat add_repo_servers_list.txt
read -p "will add opensuse_leap_15.2 repo please input y " a
echo $a

if [ "$a" != "y" ];then
        echo "you don't agree so exit now"
        exit
fi

for i in `awk '{print $1}' add_repo_servers_list.txt`
do
        ssh $i '
        sudo -u root su - root -c "zypper mr -da"
        sudo -u root su - root -c "zypper ar -fcg http://download.opensuse.org/distribution/leap/15.2/repo/oss/ OpenSUSE_Leap_152_x64_update-oss"
        sudo -u root su - root -c "zypper ar -fcg http://download.opensuse.org/distribution/leap/15.2/repo/non-oss/ OpenSUSE_Leap_152_x64_update-non-oss"
        sudo -u root su - root -c "zypper ar -fcg http://download.opensuse.org/update/leap/15.2/oss/ OpenSUSE_Leap_152_x64_oss"
        sudo -u root su - root -c "zypper ar -fcg http://download.opensuse.org/update/leap/15.2/non-oss/ OpenSUSE_Leap_152_x64_non-oss"
        sudo -u root su - root -c "zypper ref"
done(步骤略)
# mount /dev/cdrom /mnt(补充:这里以挂载 /dev/sr1 到 /mnt 目录为例)
# zypper ar file:///mnt/Module-Basesystem openSUSE15-Base或者:
# zypper ar -f /mnt/Module-Basesystem openSUSE15-Base(补充:这里以将 /mnt/Module-Basesystem 添加到软件源并命名为 openSUSE15-Base 为例)
ipmitool安装,常用指令

IPMI: Intelligent Platform Management Interface
1.下载地址:

https://sourceforge.net/projects/ipmitool/
2.安装步骤

a. tar -xvf ipmitool-1.8.18.tar.bz2
b. cd ipmitool-1.8.18
c. ./configure
d. make
e.make install
f.
modprobe ipmi_si
modprobe ipmi_devintf
modprobe ipmi_msghandler
安装成功(实测Centos7.4)
3.常用指令

    远程电源控制类 远程电源控制类
    Ipmitool -I lanplus –H 10.32.228.111 –U username –P Passwordchassis power off
    Ipmitool -I lanplus –H 10.32.228.111 –U username –P Passwordchassis power on
    Ipmitool -I lanplus –H 10.32.228.111 –U username –P Passwordchassis power reset
    Ipmitool -I lanplus –H 10.32.228.111 –U username –P Passwordchassis power cycle
    (注意power cycle 和power reset的区别在于前者从掉电到上电有1秒钟的间隔,而后者是很快上电)
    读取系统状态类
    Ipmitool sensor list  显示系统所有传感器列表
    Ipmitool fru list   显示系统所有现场可替代器件的列表
    Ipmitool sdr list   显示系统所有SDRRepository设备列表
    Ipmitool pef list   显示系统平台时间过滤的列表
    3 系统日志类
    Ipmitool sel elist   显示所有系统事件日志
    Ipmitool sel clear   删除所有系统时间日志
    Ipmitool sel delete ID 删除第ID条SEL
    Ipmitool sel time get  显示当前BMC的时间
    Ipmitool sel time set XXX 设置当前BMC的时间
    启动设置类
    Ipmitool chassis bootdev bios 重启后停在BIOS 菜单
    Ipmitool chassis bootdev pxe 重启后从PXE启动
    系统相关的命令
    Ipmitool mc info 显示BMC版本信息
    Ipmitool bmc reset cold BMC 热启动
    Ipmitool bmc reset warmBMC冷启动
    网络接口相关命令
    Ipmitool lan print 1 显示channel1的网络配置信息
    Ipmitool lan set 1ipaddr 10.32.2.2 设置channel1的IP地址
    Ipmitool lan set 1 netmask 255.255.0.0 设置channel1的netmask
    Ipmitool lan set 4 defgw ipaddr255.255.0.254 设置channel4的网关
    Ipmitool lan set 2 defgw macaddr  设置channel2的网关mac address
    Ipmitool lan set 2 ipsrc dhcp 设置channel2的ip 源在DHCP
    Ipmitool lan set 3 ipsrc static 设置channel2的ip是静态获得的
    通道相关命令
    Ipmitool channel info 显示系统默认channel
    Ipmitool channel authcap channel-number privilege  修改通道的优先级别
    Ipmitool channel getaccess channel-number user-id 读取用户在通道上的权限
    Ipmitool channel setacccess channel-number user-id callin=on ipmi=on link=onprivilege=5 // 设置用户在通道上的权限
    看门狗相关命令
    Ipmitool mc watchdog get 读取当前看门狗的设置
    Ipmitool watchdog off   关掉看门狗
    Ipmitool watchdog reset   在最近设置的计数器的基础上重启看门狗
    用户管理相关命令
    Ipmitool user list chan-id 显示某通道上的所有用户
    Ipmitool set password [] 修改某用户的密码
    Ipmitool disable   禁止掉某用户
    ipmitool enable   使能某用户
    ipmitool priv [] 修改某用户在某通道上的权限
    ipmitool test <16|20>[<password]> 测试用户
————————————————
版权声明:本文为CSDN博主「Rudy,Zhao」的原创文章,遵循CC 4.0 BY-SA版权协议,转载请附上原文出处链接及本声明。
原文链接:https://blog.csdn.net/weixin_40343504/article/details/82664389
注明:所有转载内容皆直接从被转载文章网页的标题和内容的文本中复制而来
